Thursday, October 14, 2010

Chocolate Pumpkin Pudding

Here is another fun fall recipe. This is the easiest and quickest fall dessert recipe I have found! It seriously only takes minutes and won't disappoint!

Chocolate Pumpkin Pudding

Ingredients:

1 (15-ounce) can pumpkin puree
1 large package instant chocolate pudding mix
1/4 cup milk
1 teaspoon ground cinnamon
2 cups prepared whipped cream

Directions:

1. In a medium bowl, beat together pumpkin, puddings, milk, and cinnamon until blended.

2. Gently fold in the whipped cream and chill until serving.


Helpful Hints:

* I decided to use instant devil's food chocolate pudding since I had it in the cupboard and it was good but it was really rich and I think almost too chocolaty for me! Crazy...I know. Next time I will definitely go with regular chocolate or the chocolate fudge.

*I did mix a little of the whip cream into the pudding mixture but I reserved some to top it off with

*Be creative! I am thinking this would be really good using the white chocolate pudding too.


Pumpkin Soup

It has been too long! But I have been busy trying out lots of recipes, just really behind on getting them posted. I figured I would start with a yummy fall soup!

1-2-3 PUMPKIN SOUP

What you need:
1 tablespoon butter
1 medium onion, finely chopped
2 cloves garlic, crushed
1 can of pure, plain pumpkin
3 cups chicken broth
1 tablespoon tomato paste
grated parmesan cheese
salt
pepper

Directions:
1) melt butter in a large saucepan over medium heat. Add onions and garlic and cook until translucent, 3-4 min, stirring.

2)Add pumpkin, chicken broth and tomato paste and stir to mix well. Bring to a boil over high heat, lower to a simmer and cover. Cook 20 minutes.

3)Transfer to a food processor (or blender) and puree until smooth. Add cheese, salt and peper and enjoy!
Helpful Hints:
* as you can see in my picture of ingredients I used the pre-chopped frozen onions. My new favorite item! I HATE chopping onions because my eyes are super sensitive and water for hours after.
*I used my blender to puree the soup and it worked great. I served it immediately so it was still hot. If it is going to be awhile before you serve it just pour it back into your pan and keep it covered over low heat.
*Delish served with cheesy breadsticks or Asiago bread


Sunday, August 29, 2010

Baked Brown Rice

Lately my attempts at preparing the perfect brown rice have not been successful! I have tried several different methods and bought several different types of rice and still haven't gotten the results I was hoping for. One thing I did learn is nothing will work on the cheap Walmart brand brown rice! After a couple of failed attempts I turned to the internet for help. The winning advice comes from Alton Brown of the Food Network. I followed his recipe for Baked Brown Rice using rice I purchased at Winco from their bulk food bin. I have made it using this recipe a few times and each time had good results!


Ingredients
  • 1 1/2 cups brown rice, medium or short grain
  • 2 1/2 cups water
  • 1 tablespoon unsalted butter
  • 1 teaspoon kosher salt

Directions

Preheat the oven to 375 degrees F.

Place the rice into an 8-inch square glass baking dish.

Bring the water, butter, and salt just to a boil in a kettle or covered saucepan. Once the water boils, pour it over the rice, stir to combine, and cover the dish tightly with heavy-duty aluminum foil. Bake on the middle rack of the oven for 1 hour.

After 1 hour, remove cover and fluff the rice with a fork. Serve immediately.

What is your favorite way to prepare Brown Rice?

Baked Brown Rice recipe from foodnetwork.com

Tuesday, July 13, 2010

Homemade Teriyaki Sauce


Ever wondered how to make Teriyaki Sauce? The other day I was at the store looking to purchase a bottle of Teriyaki Sauce, while reading the labels I noticed the store I was at didn't have any available that didn't contain high fructose corn syrup. Which got me thinking, "what would it take to make my own?" Thanks to todays technology I was able to pull up some recipes for Teriyaki Sauce right there in the store and I was shocked at how easy it sounded and how many of the items I already had at home. So I picked up a couple of things I needed and headed home to try it out. So so easy and delish! And my favorite thing about it.....it is so much thicker than the stuff you buy.

Teriyaki Sauce
from: Food.com

*1/4 cup Soy sauce
*1 cup water
*1/2 teaspoon ground ginger
*1/4 teaspoon garlic powder
* 5 tablespoons brown sugar
*1-2 tablespoons honey
*2 tablespoons cornstarch
*1/4 cup cold water

Directions:
Mix all but cornstarch and 1/4 cup water in a sauce pan and begin to heat over medium/high heat. Mix cornstarch and cold water in a cup and dissolve. Add to the sauce in the pan stirring occasionally. Heat until the sauce thickens to desired thickness. If it become too thick you can add a little bit of water to thin.

Helpful Hint
* I had quite a bit left over so I put it in a container in the fridge and a couple of days later I reheated it in a sauce pan on the stove and it worked great. I am not really sure exactly how long it would keep in the fridge but I recommend using it within 5 days.


Hawaiian Chicken Patties


Remember those Tyson Chicken Patties I raved about a while ago? Well, here is another reason why I love them! I am always trying to find new ways to use them and this time my idea turned into one delish entree if I may say so myself! Here it is:

Hawaiian Chicken Patties
by: Lindsey Mosbarger

What you need:
Tyson brand frozen chicken patties
Canned pineapple rings
Teriyaki Sauce
Slices of Swiss cheese

Cook how ever many chicken patties you need according to the directions on the package. You may want to take them out of the oven about 3 minutes early. After removing from the oven brush on a generous amount of Teriyaki sauce to the top of each chicken patty, place a pineapple ring on top of each patty (you can brush on a little more Teriyaki sauce if you want, I did) and then lay a slice of swiss cheese over the pineapple ring and place back in the oven just long enough to melt the cheese. About 2-3 minutes. Serve immediately!

Helpful Hints:
*You can use store bought Teriyaki sauce or easily make your own. See recipe above for homemade Teriyaki Sauce.
*These would be good on a bun if you wanted to make it into a chicken sandwich
*Great served with a side of brown rice

Enjoy!


Thursday, July 8, 2010

Buffalo Chicken Pizza


WARNING: Spicy! May cause your nose to run and make your eyes water. If you like a little kick of flavor every now and again you will lOvE this pizza! It is quick and easy to make and full of flavor.
Buffalo Chicken Pizza:
by Lindsey

What you need:
Pizza crust of your choice
1 bottle of Blue Cheese Salad dressing
1 bottle of wing sauce
3-4 chicken breasts cooked and shredded
2 cups of shredded mozzarella cheese

Directions:
Preheat oven to 400 degrees. Prepare your pizza crust according to directions. Spread Blue Cheese dressing over the pizza crust as you would pizza sauce. Mix cooked and shredded chicken with wing sauce. You want just enough sauce to coat the chicken unless you really like things spicy then add more. Next, spread the chicken over the pizza crust and top with mozzarella cheese. Bake until the crust is golden brown and the cheese bubbles approximately 10-15 min.

Helpful Hints
*I cooked my chicken in the crock pot and then shredded it. You can cook the chicken however you normally do and then cube it instead of shredding it if you prefer.
*Feel free to add any other toppings. I am still debating whether or not to add anything next time. I am thinking diced tomatoes and maybe some green/red bell peppers might be good.
*If you aren't a fan of Blue Cheese you could substitute Ranch dressing.


Vanilla Beans

I have had a few people ask me about the vanilla beans for the Whipped Vanilla Bean Cheesecakes. So here are a few pictures of what to expect when working with vanilla beans:

First, incase you don't know what they look like this is what you are looking for
When cutting into a vanilla bean you want to lay it flat on a cutting board, holding one end against the cutting board slice it right down the middle lengthwise. This next picture shows what you will see when you pull it apart
You can use the tip of your knife, a spoon or whatever else you can think of to scrape out the tiny little seeds.

I hope that helps! It really is easy and it adds such good flavor. There are several other ways to use vanilla beans too. You can make your own vanilla extract & give your sugar a vanilla flavor. I have also heard that you can use the vanilla beans to add flavor to drinks such as lemonade, tea, coffee, hot chocolate, etc.... The possibilities are endless...... have fun with it!

Thursday, June 17, 2010

Chocolate Blueberry Cake


Trust me on this one...... when I first saw this recipe I was intrigued. I wasn't quite sure if it sounded good but I wanted to try it. I am glad I did! It is quite YUMMY! Let's just say when I told people about it I got some weird looks. However, those who tried it lOvEd it and were asking for the recipe. Try it.....you won't regret it! (I hope)

This recipe was a $25,000 award winner in a Better Homes and Garden recipe contest. Submitted by Dorothy Olsen.

Chocolate Blueberry Cake: (makes an 8x8 cake)
  • 1 cup whole wheat flour
  • 1 cup sugar
  • 6 Tablespoons unsweetened cocoa powder
  • 1/2 teaspoon baking soda
  • 3/4 teaspoon baking powder
  • 1/4 teaspoon salt
  • 3/4 cup water
  • 1 egg
  • 1/2 cup blueberries, fresh or frozen
Preheat oven to 350 degrees. For the cake- mix dry ingredients in a medium sized bowl. In blender combine water, egg and blueberries. Blend until smooth.
Add liquid mixture to flour mixture. Beat with mixer, scraping sides of bowl occasionally. Pour into greased 8x8 square pan. Bake for 30 minutes or until toothpick inserted in center comes out clean.

Ganache:
  • 1 cup reduced fat whipped topping, like Cool Whip lite
  • 1/2 cup semi sweet chocolate chips
In a small microwave safe bowl combine chocolate chips and whipped topping. Microwave for 30-60 seconds, stirring every 30 seconds. Stir until smooth. Set aside. When cake has cooled, cover with ganache.

Blueberry Sauce:
  • 1/2 cup blueberries
  • 1/2 cup reduced fat whipped topping
Blend thawed blueberries and whipped topping in a blender until smooth and liquid. Drizzle over cake.
Helpful Hints:
* In place of the Cool Whip Lite topping I used Whipping Cream. This adds quite a few calories but I try to avoid high fructose corn syrup where I can. I whipped it up with beaters and then added it where the recipe calls for the whipped topping.
* I would wait until ready to serve to add the blueberry sauce.


Recipe is from the Better Homes and Garden website.

Whipped Vanilla Bean Cheescake


Almost as good as the Vanilla Bean cheesecake from the Cheesecake Factory......almost! This cheesecake is easy to make and it is light, fluffy and oh so yummy!

Whipped Vanilla Cheesecake Filling:

1 cup (240 ml) whole milk, divided

2 1/2 teaspoons powdered gelatin

12 ounces (340 g) Philadelphia cream cheese

1 cup (7 oz/200 g) granulated sugar

1 cup (240 ml) heavy cream

1 cup (240 ml) sour cream

1 vanilla bean, split lengthwise with a paring knife and seeds scraped out

Make the cheesecake filling:

1. Place 1/2 cup of the milk in a small container. Sprinkle the gelatin over the milk and set aside to soften.

2. Place the remaining 1/2 cup milk, the sugar, and cream cheese in a medium saucepan over medium-low heat. Cook, whisking constantly, until the cream cheese melts and the mixture is smooth, about 3 minutes. Add the milk and gelatin mixture and whisk until the gelatin is dissolved. Pour the mixture through a fine-mesh sieve into a medium bowl. Cool the mixture to room temperature.

3. In the bowl of an electric mixer, using the whisk attachment, beat the cream, sour cream, and vanilla bean seeds at high speed until the mixture just begins to form soft peaks. Add the cooled cream cheese mixture at low speed. Increase the speed to medium and mix until the mixture is well blended and smooth. Scrape the filling into the prepared pan, over the crust, and refrigerate for at least 4 hours, until set.

Helpful Hints:

*The night before I was making this recipe I placed the 1 cup of sugar and the vanilla bean in an airtight container and let it sit over night. This will infuse the sugar with a nice vanilla flavor.

*I used the ready made mini graham cracker crusts by Keebler (you can easily fill about 18 mini crusts)

*I don’t have a fine mesh sieve so I skipped that step and it turned out fine.

* To cut calories/fat you can substitute half of the cream cheese for Neufchâtel cheese. Usually found right next to the cream cheese.

* I found this recipe online @: http://tishboyle.blogspot.com

I only used her Whipped Vanilla Bean Cheesecake filling recipe.

I used the Keebler pre made mini crusts and a different berry sauce. (see below for the sauce recipe I used)

I believe she also has a recipe for a graham cracker crust if you need it.

Blackberry Raspberry Sauce


This sauce is DeLiSh and so simple! I served it drizzled over the Vanilla Bean Cheesecake I made but it would be aMaZiNg on almost anything! Ice cream, pancakes, waffles, crepes, etc....

Blackberry Raspberry Sauce:

Ingredients

1/2 cup sugar

1/3 cup water

1 cup fresh or frozen blackberries

1 cup fresh or frozen raspberries

1 tablespoon fresh lemon juice

Preparation

Combine sugar and water in a small saucepan, and bring to a boil. Cook for 1 minute over medium heat, stirring until the sugar dissolves. Combine the sugar syrup, blackberries, raspberries, and lemon juice in a blender. Pulse 3 times or until the berries are chopped. Cover and chill.

Note: Store remaining sauce in an airtight container in refrigerator.


Tuesday, May 25, 2010

Honey Lime Chicken Enchiladas

These enchiladas are yUmMy! They have a sweet tangy flavor that messes with your taste buds in the most succulent way. Enjoy....
Honey Lime Chicken Enchiladas
from Debbie

6 tablespoons honey
5 tablespoons lime juice (1 large lime)
1 tablespoon chili powder
1/2 teaspoon garlic powder

1 pound chicken, cooked and shredded
8-10 flour tortillas
1 pound monterey jack cheese, shredded
16 0z green enchilada sauce
1 cup heavy cream (whipping cream)

Mix the first four ingredients and toss with shredded chicken. Let it marinate for at least 1/2 hour. Pour about 1/2 cup enchilada sauce on the bottom of a 9x13" baking pan. Fill tortillas with chicken and shredded cheese. Make sure to save some cheese to sprinkle on top. Mix remaining enchilada sauce with the cream. If you have any marinade or chicken left you can also add it to the sauce. Pour sauce on top of enchiladas and sprinkle with cheese. Bake at 350 degrees for about 30 min, until brown and crispy on top.


Helpful Hints:
* I cooked the chicken in my crock pot (just put chicken and 1/2 cup of water in) for about about 6 hours the day before, shredded it and mix it with the marinade and let it sit in the fridge overnight.
*Serve with rice or a side of beans (black beans would be really good)
* this dish can be made and frozen! Perfect if you are trying to prepare meals to have on hand. If you freeze: Preheat oven to 350 degrees and bake enchiladas COVERED (without thawing first) for 1 hour. Uncover and bake 30 minutes longer, until brown and crispy on top.


Thursday, May 13, 2010

Spicy Chicken Wraps


by lindsey

Easy as 1,2,3

What you need:
  • Tyson Spicy Chicken Breast Patties
  • tortillas
  • grated cheese
  • sprouts or lettuce
  • ranch dressing
  • veggies of choice (tomatoes, cucumber, red/green peppers, onions)
  1. Cook the chicken patties as directed on the package
  2. Cut the patties into strips
  3. Have fun building your wrap
Helpful Hints:
* also good in pitas
*if you don't like spicy you can get the Tyson Original Chicken Breast Patties
*I prefer sprouts over lettuce because they have more nutritional value. Soybean sprouts are the best. (see here)

Tuesday, May 11, 2010

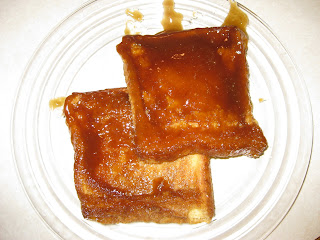
Creme Brulee French Toast

Sooo delish! Similar to the Carmel French Toast recipe I posted a while ago but I think I like this one better. YUMMY!

by lindsey

(recipe from the food network)
Ingredients:
  • 1/2 cup (1 stick) unsalted butter
  • 1 cup packed brown sugar
  • 2 tablespoons corn syrup
  • 1 (8 to 9) inch round loaf Challah bread
  • 5 large eggs
  • 1 1/2 cups half and half
  • 1 teaspoon vanilla
  • 1 teaspoon Grand Marnier
  • 1/4 teaspoon salt

Directions:In a small heavy saucepan melt butter with butter with brown sugar and corn syrup over moderate heat, stirring, until smooth and pour into a 13 by 9 by 2-inch baking dish. Cut 6 (1-inch) thick slices from center portion of bread, reserving ends for another use, and trim crusts. Arrange bread slices in one layer in baking dish, squeezing them slightly to fit. In a bowl whisk together eggs, half and half, vanilla, Grand Marnier and salt until combined well and pour evenly over bread. Chill bread mixture, covered, at least 8 hours and up to 1 day. Preheat oven to 350 degrees F and bring bread mixture to room temperature. Bake uncovered, in middle of oven until puffed and edges are pale golden, 35 to 40 minutes.

Helpful Hints:

*I left out the Grand Marnier

*I substituted Pure Maple Syrup for the corn syrup (supposed to be healthier)

* I couldn't find the Challah bread anywhere so I used good old Texas Toast and I also reduced the number of eggs to 3.

*If you have ever made this please let me know what bread you used and if you used the Grand Marnier. Thanks!

Blackberry Shortcake


by lindsey

Blackberry Shortcake
* blackberries
*1 container (80z) cool whip, thawed
*2 1/3 cups Original Bisquick mix
*2/3 cup milk
*3 Tbsp sugar
*3 Tbsp butter, melted

Heat oven to 425*
STIR Bisquick mix, milk, sugar and butter until soft dough forms. Drop 6 spoonfuls onto ungreased cookie sheet.
BAKE 10-12 minutes or until golden brown. Split warm shortcakes: fill and top with blackberries and whipped topping.
high altitude (3500-6500 ft): heat oven to 450*F. For shortcakes, decrease sugar to 1 Tbsp.

Helpful Hints:
* I got the recipe for the shortcakes on the back of my box of Bisquick however they used strawberries.
*Any berries would be good!
*If you use strawberries it is good with a little chocolate syrup drizzled over the top.
*I added a dash of cinnamon to the bisquick mix


Sunday, April 25, 2010

Coconut Chicken


If you LOVE coconut this recipe is for you!

Baked Coconut Chicken

Preheat Oven to 350F
1/4 cup melted butter
Chicken breasts/tenders
1/2 cup flaked unsweetened coconut
1/4 cup bread crumbs

Brush the chicken with melted butter. In a shallow bowl, stir together the coconut and bread crumbs. Roll the chicken in the coconut mixture. Place the chicken in a baking pan. Drizzle any remaining butter over the chicken and sprinkle with any remaining coconut mixture. Bake for about 1 hour or until chicken is no longer pink inside.

Helpful Hints~
  • Serve with brown rice
  • Delish served with a side of Sweet n Sour sauce for dipping.


Raspberry Peach Jam


Raspberry Peach Jam

5 c. smashed peaches
5 c. sugar
6 oz. pkg of Raspberry jello

Peel peaches using really hot water to make the skins come off easy. Then smash to desired consistency. Mix peaches and sugar in pot on stove. Bring to a slow boil and boil for 20 minutes stirring periodically so as not to scorch the bottom. Remove from heat and stir in package of jello. Pour into hot bottles. (Can remove when hot from dishwasher or boil in water on stove top.) Clean top of bottles with a rag to insure a good seal. Put hot lids on bottle and twist on ring as hard as possible. Then slightly loosen ring so bottle mouth will not chip and break. Turn jar upside down and let set for 24 hours allowing the jar to seal. For shelf life, tighten rings once more.

Makes 4 pints of jam
Helpful Hints~
  • I used frozen peaches. They are already peeled and sliced! And if they aren't in season the frozen ones are going to have better flavor than the ones you find in the store.
  • Feel free to use any flavor of jello. Original recipe called for Strawberry jello but I wanted to use raspberry.
  • Be sure to use Jello brand and not a generic brand. You get better flavor with Jello brand.

Bacon Swiss Chicken

First off, I know this picture is doesn't really make this dish look very appetizing but I promise it is good!

Bacon Swiss Chicken
By Lindsey
*Tyson brand chicken breast patties
*Bacon
*Swiss cheese
*Dijon Mustard for dipping
Cook bacon as you always do. Bake the chicken patties as instructed. Take a strip of bacon and break it in half and place on top of each chicken patty and top with a slice of cheese. Place patties back in the oven long enough for cheese to melt. Remove from the oven and serve!

Helpful Hints:
* feel free to use any type of cheese. I have also made this with grated mozzarella and it was just as good!
* you can eat it as is or you can serve with dipping sauce. We like it with Dijon mustard. If you like hot/spicy things try it with buffalo wing sauce. When using the buffalo sauce you can serve on the side for dipping or you can brush some on top of the chicken patty before placing bacon and cheese. Tyson also makes a spicy chicken breast patty that you can buy instead of the plain chicken.

Tuesday, February 16, 2010

Chocolate Pretzel Gems

These little gems were recently introduced to me by a lady that I work with. After trying one I was begging for the directions. I was beyond excited when I learned how easy they were! Be careful they are ADDICTING!

Chocolate Pretzel Gems
From Debbie

Small Pretzels
Hershey Kisses
M&Ms (I accidentally bought the Valentine peanut butter ones and it ended up being a tasty mistake. One I reccomend :)

Turn oven to 250 degrees. Spread pretzels out on a cookie sheet. Place a hershey kiss in the center of each pretzel. Place in oven for 3 minutes. Remove from oven and immediately press a M&M into the hershey kiss. Let cool for 2-3 hours.

Helpful Hints:
* When pressing the m&ms into the kisses I found the first few did not want to compress easily and the kisses would slide off to the side. Don't press too hard, if the kiss isn't compressing easily leave the m&m where it is and come back to it in a minute and try again. I found I could easily press the m&m down all the way after letting it sit for a minute.
* You can use any shape of small pretzels. These worked good for valentines because they kind of look heart shaped with the stuff in the middle. But you can use square, round or traditional.
* If you don't have time to let them set for a couple of hours stick them in the fridge for 3-5 minutes
* These can be made festive for just about any holiday using the holiday m&ms
* Mix it up~ you can use any flavor of hershey kiss as long as it has a soft center or rolo's if you like carmel. You could also use the flavored m&ms, reese's pieces (perfect for fall/halloween) or pecans ( yummy on top of a rolo).
Holiday Ideas:
Valentine's~ could use cherry cordial kisses w/ m&ms, or regular kisses with cherry chocolate m&ms, regular m&ms or peanut butter m&ms in valentine colors.
Easter~ use hershey hugs and easter m&ms (mint or regular) or jelly beans
Christmas~ hershey kisses w/mint m&ms or regular m&ms in holiday colors
* The possibilities are endless. Be creative! And please share your ideas!
Enjoy!

Easy Pita Pizza

Easy Pita Pizza

Pitas
Tomato Sauce
Turkey Pepperoni (or regular if you prefer)
Red & Green Bell peppers diced
Mozzarella Cheese

Preheat oven to 350. Build your pizza on the pita. Just use a little of everything! It doesn't take much just to get the flavor. Sprinkle lightly with cheese. Bake for about 10 minutes or until cheese is melted. Enjoy! It would be good with mushrooms, olives, onions and any other veggies.
***This is a somewhat healthier way to enjoy pizza. I have been trying to eat healthier and found that this helps curb my cravings for pizza. This exact pizza is under 340 calories. I purchased the pitas at a health food store and all other ingredients at my local grocery store.***

If you have a healthy recipe that you love please email it to me. I would love to try it and post it for others! Thanks!

Thursday, January 28, 2010

Raspberry Chocolate Cheesecake Trifle

Heaven! Okay, so I LoVe Trifles and I love trying out different combinations. You really can't go wrong with creating your own. You will be seeing many more Trifle recipes. But for now here is one of my favorite Trifle creations!

Raspberry Chocolate Cheesecake Trifle
by Lindsey

1 box Devil's Food Cake Mix
2-3 oz boxes Cheesecake Instant Jello Pudding
Cool Whip
Raspberries

  1. Prepare the cake as directed on the box and bake
  2. Cool cake in the pan on a wire rack for 15 minutes and then remove from the pan and let cool completely
  3. While cake is cooling prepare pudding as directed on the box and refrigerate
  4. Trim edges from cooled cake and then cut cake into medium to large cubes (whatever size you prefer)
  5. Start layering: cake, pudding, raspberries until you get to your final layer, then you will do: cake, pudding, cool whip and top with raspberries
Helpful Hints:
* You can use any chocolate cake mix
* When you start layering.....
Cake- you will want a good full
layer of cake. Number of cubes
will vary depending on the size.
Press slightly to compress
cake layer.
Pudding- Spoon pudding on top of cake
Approx. 2 cups. You don't want
to drowned the cake in pudding
but you do want enough to
allow it to run
a little between pieces
Enjoy!


Caramel French Toast


Need I say more? Here you go:

Overnight Caramel French Toast

2 tbsp. light corn syrup
1/2 c. butter
1 c. brown sugar (packed)
6-12 slices bread
5 eggs
1 1/2 c. milk
1 tsp. vanilla

In small saucepan combine corn syrup, butter, and brown sugar. Cook over medium heat until thickened, stirring constantly. Pour this mixture over bottom of 13 x 9-inch pan. Lay 6 slices of bread over sugar mixture. Mix eggs, milk and vanilla in medium bowl. Pour part of egg mixture over bread. Then layer remaining 6 slices on top. Pour remaining egg mixture over all. Cover pan and refrigerate overnight.

Bake in 350 degree oven for 45 minutes (uncovered.) Serve immediately.

Helpful Hints:

*I used Texas toast and only did one layer(6 pieces).

*If you only do one layer reduce eggs to 3. When pouring egg mixture over bread if it seems like too much it probably is! I just poured it all on, the whole time thinking it was too much and in the end it was. It was almost like custard because it was too much egg. You just want the bread lightly coated in egg.